
|
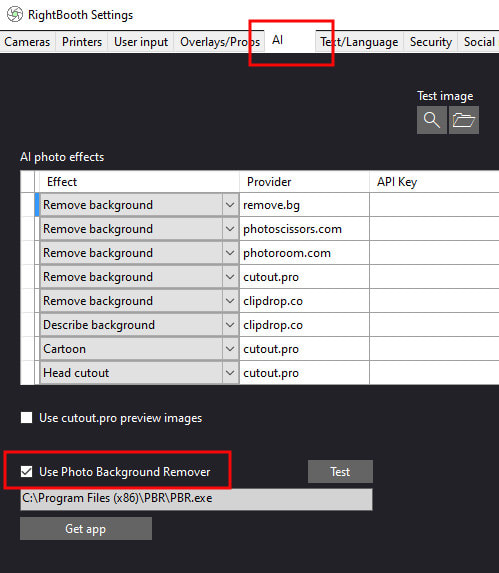
If you are running RightBooth (version 7.14.24 or later) on Windows 11, you can replace the backgrounds in your photos using the Photo Background Remover app (PBR). PBR works completely locally and makes use of the Microsoft Paint app (included on Windows 11) in order to remove photo backgrounds,. So PBR does not require the Internet and it does not require you to pay for usage credits or ongoing subscriptions. This article shows you how... Step 1 - Download and install the Photo Background Remover App (PBR) Is it free to use? Yes... When you are using PBR from within RightBooth (as described in this article), you will not need to purchase a product code for PBR. PBR can remain in Evaluation mode and it will not apply a watermark to the output files when being used in RightBooth. If you want to use PBR outside of RightBooth, then you will need to buy a PBR product code (details at the above link). Step 2 - Set up RightBooth to use PBR
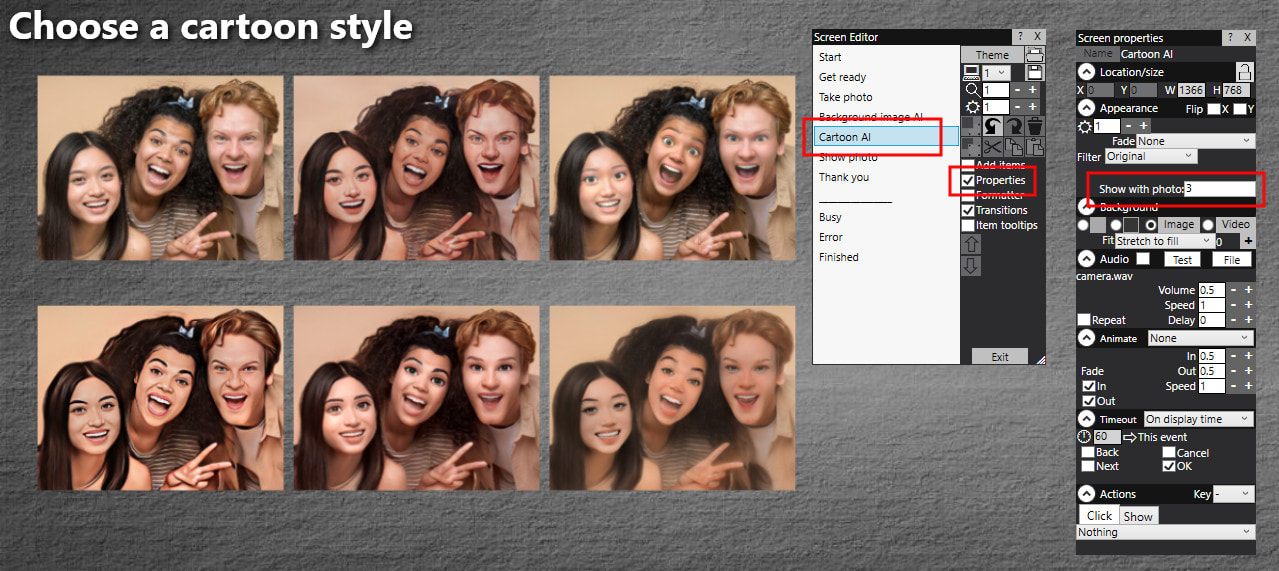
 Step 3 - Add photo background AI into your RightBooth photo capture event
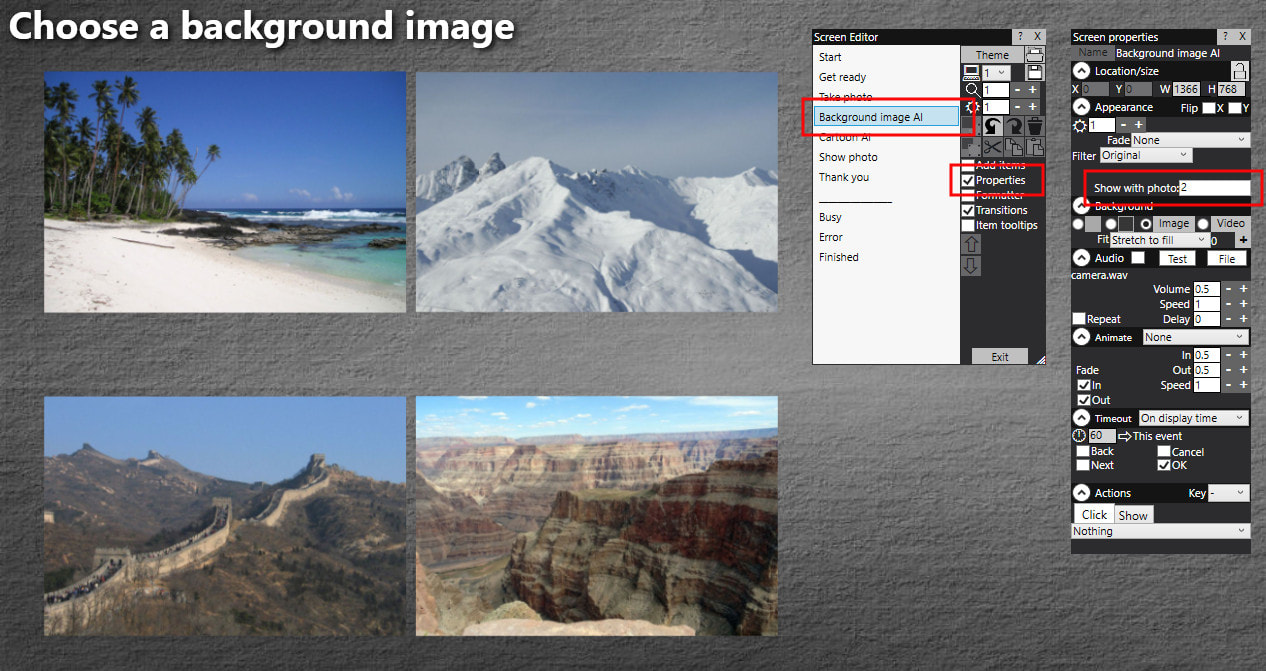
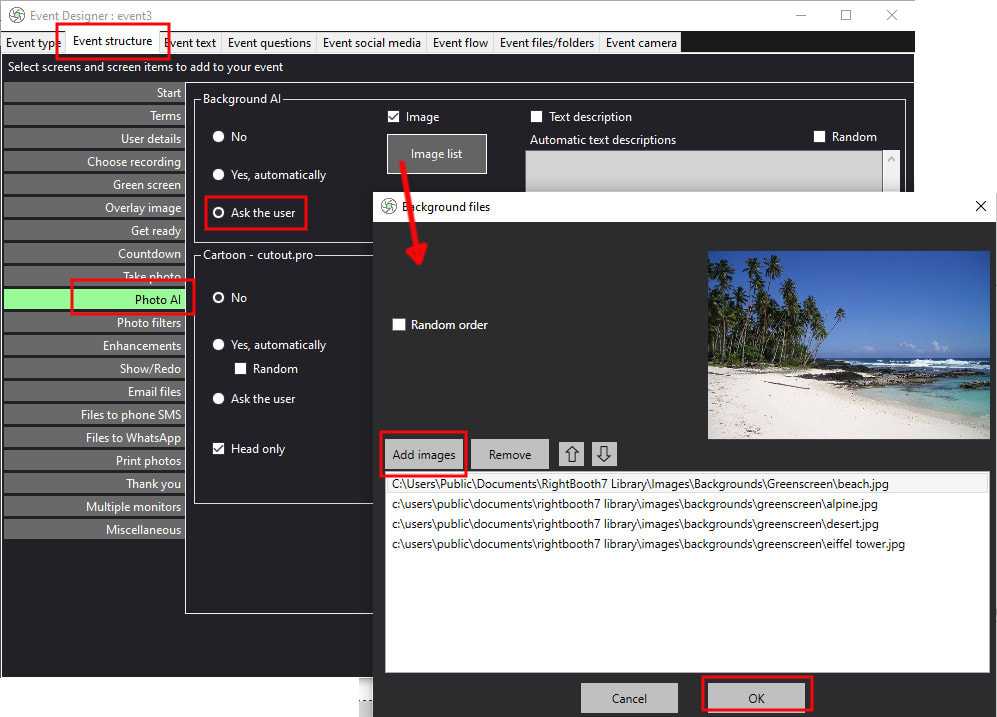 This will cause RightBooth to add the 'Background Image AI' event screen into the event workflow. You can then use the Screen Editor to view and edit the screen: 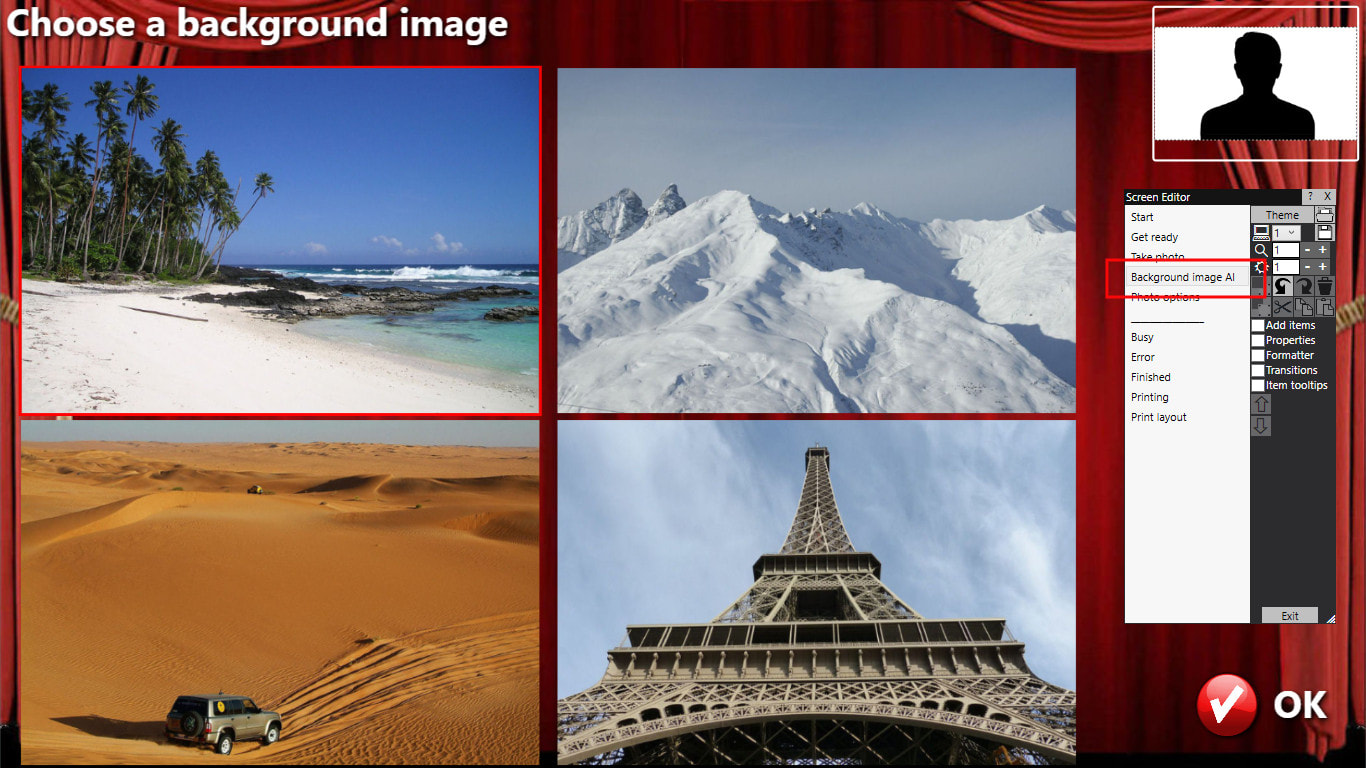 Job done !
Play the event. Now after each photo is taken, RightBooth will let you choose a background image and it will then automatically use the Photo Background Remover to replace the photo background with your chosen image.
0 Comments
RightBooth version 7.14.22 introduces the 'Print layout override' feature. This allows users to choose a print layout, which then determines how many photos will be taken to fully populate the layout. Watch the video demo for an explanation: Video, demonstrating using 2 instances of RightBooth to record 2 videos at the same time: Here is the specification of the equipment I used to record this video: HP Envy Laptop 17-ae1xx, i7-8550U, CPU @ 1.8Ghz, 250Gb SSD, NVIDIA GeForce MX150, (4 years old), Win 10 Home, Webcam 1 integrated in the laptop, Webcam 2 Logitech C270 connected to a spare USB 3 port. The video demo was recorded with both webcams set at 640x480x25fps. In terms of memory and CPU usage, here are some results when the webcams are both set to record videos at 1280x720x25fps. Resource usage when both RightBooth instances are sat idle: 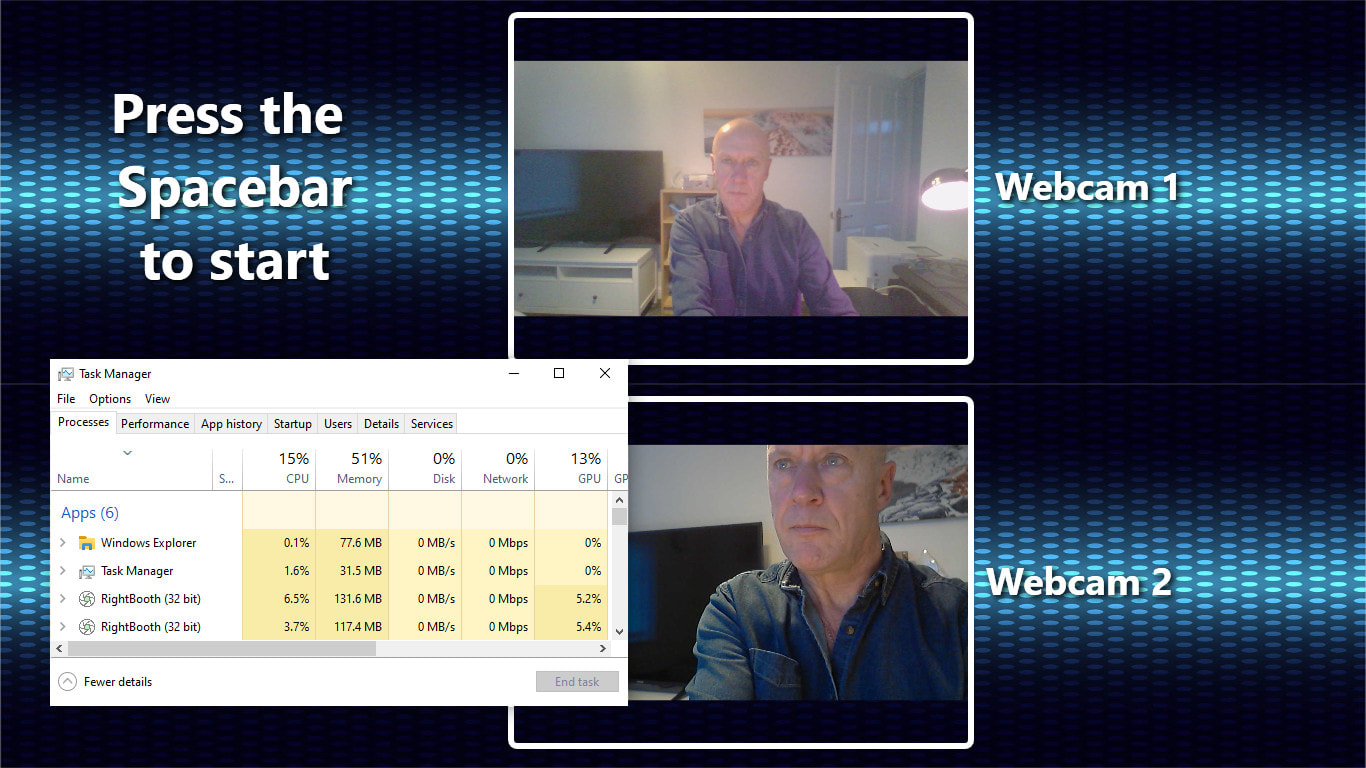 Resource usage when both RightBooth instances are recording videos: 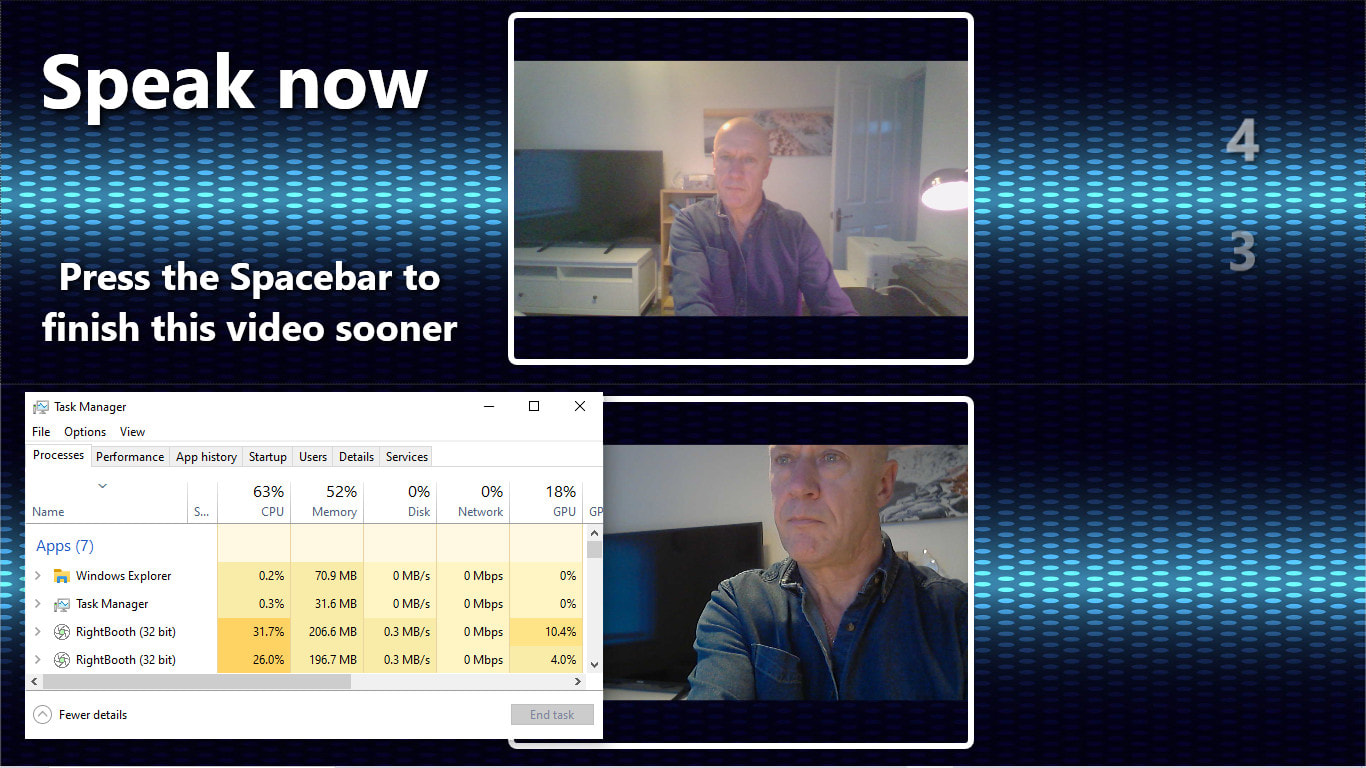 Another example using the following newer computer: hp laptop: Model: ENVY 17-cw0xxx. CPU: i7-13700H, 2.4Ghz, 16Gb RAM, 500Mb SSD HD. Windows 11. Using webcams: Logitech C920 and Logitech C270. Recording videos at 1920 x 1080 x 25fps and 1280 x 720 x 25 fps respectively. In this test you can see that there is a much reduced CPU and memory usage. There is also an improved recording capability, which goes to show that newer is better... 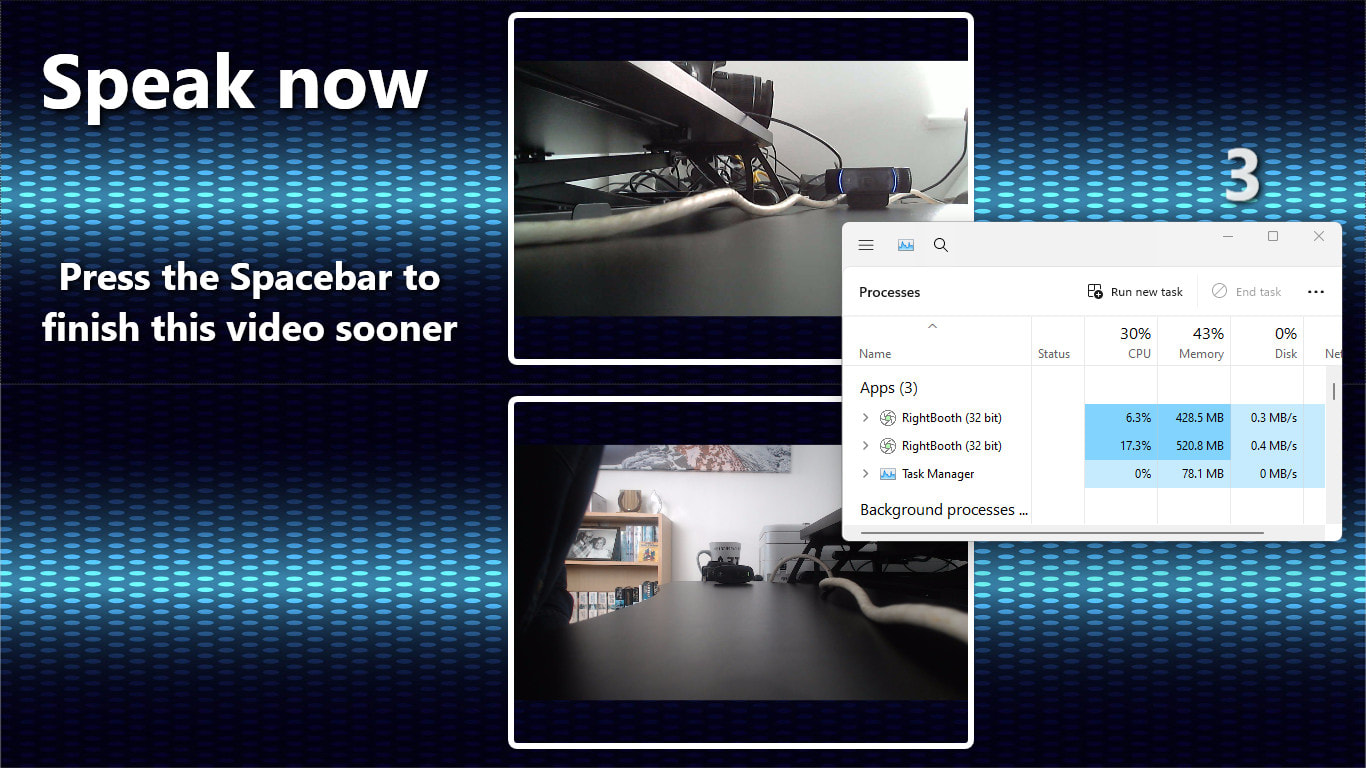 Latest training video showing how to use a dynamic QR code on a Sharing Station Start screen. Note that this feature requires using RightBooth v7.14.17 (or newer). New features and fixes in RightBooth version 7.14.7...
RightBooth version 7.14.4 is now released and contains the following new features:
Add the 'Define file' option to image items, video items and audio files This allows the inclusion of any RightBooth text variables in the folder and file definitions. Example: Using the file definition: 'c:\images\{FIRSTNAME}.jpg', this will take the first name entered on the User Details event screen and insert it into the definition to form a user specific file reference. So in this example if the first name ‘Nigel’ is entered on the User Details screen, then the above file reference will become: ‘c:\images\Nigel.jpg’ to allow displaying a user specific image on subsequent event screens. Add the 'Fallback file' option for 'Define file' image items, video items and audio files This allows a secondary file to be defined that will be used if the defined file (see above) is not found. Add the 'Start/Stop' setting: 'Prevent playing events on battery power' This will force the PC to be connected to mains power when you play any RightBooth event. Add the DSLR setting: 'Turn off live view for photo capture' If you are using a non-Canon flash unit this will allow it to fire when RightBooth takes photos. Add the AI effect setting: 'Use cutout.pro preview images’ This option allows you to reduce the cutout.pro AI credit usage to 0.25 per background removal service call. You have created a photo capture event where each user will take 3 photos and you would like to apply different AI photo affects to each of the 3 photos:
This article explains how to set up your event so that different AI effects are applied to specific photos in the set. Include the Background AI and Cartoon AI screens in your event
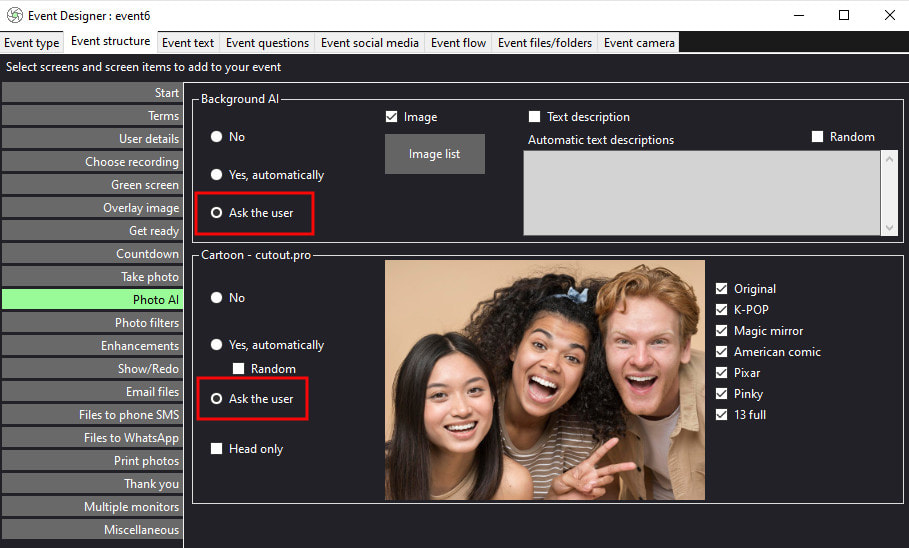 Set the Background AI to apply only to the Second Photo
 This will cause the Background Image AI screen to only be used on the second photo. Set the Cartoon AI to apply only to the Third Photo
 This will cause the Cartoon AI screen to only be used on the third photo. Set the AI Effects to Automatic (Optional)
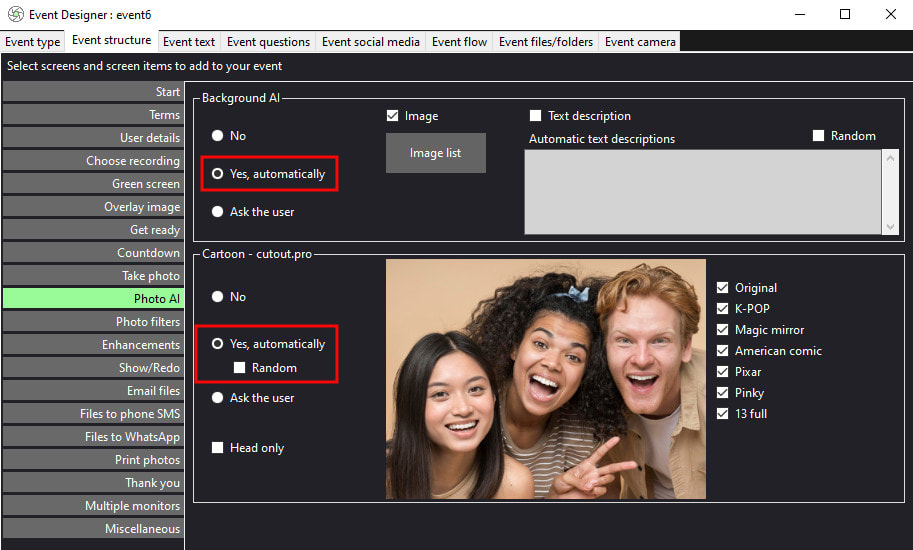 Now when you play the event, the second photo will automatically have the background AI effect applied to it and the third photo will automatically have the cartoon AI effect applied to it.
RightBooth version 7.14.0 is now released. The full set of new features are listed on the Release Notes page. Video overview of the main new features: Video tutorial covering the new AI Photo Effects: Please note that AI Service Provider credit purchase is required to enable the AI Photo effects in RightBooth An update to Windows 11 will be released on September 26th. It contains a number of AI driven features, including free photo background removal and AI image generation. The aim will be to find ways to integrate these free features into the RightBooth photo capture workflow. Taster video here: Full presentation: Updated October 2023 The AI ship has set sail so I thought I had better jump on board !! Development work has been completed to add the following AI features into the event workflow of RightBooth:
The functionality relies on an Internet connection and also obtaining AI credits from one or more of the many AI service providers. Here are a few examples of what you can achieve. The guest types the words: 'beach sunset' into RightBooth and then the AI background replacement feature automatically generates a totally unique background:
Examples of some of the cartoon replacement styles that are provided:   An example of heads being converted into cartoons, leaving the rest of the original photo untouched: 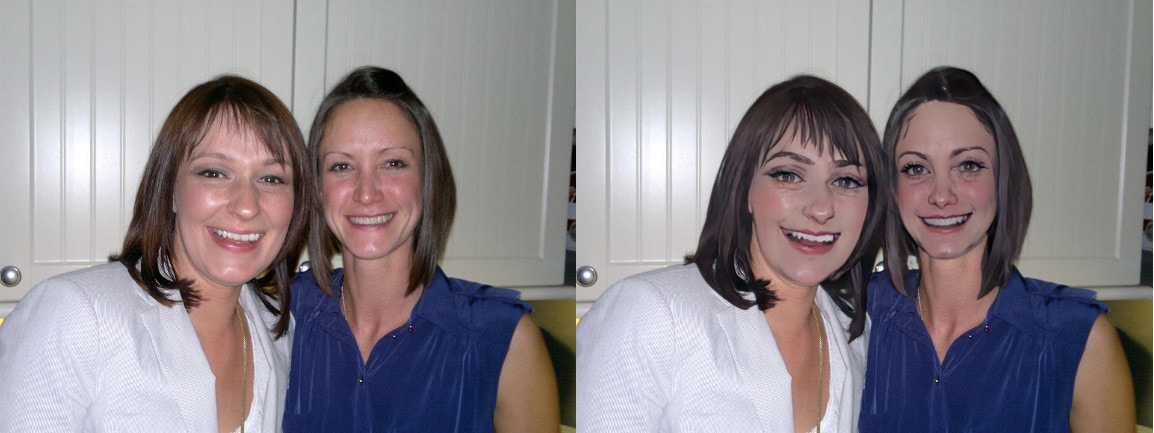 New features and fixes:
New Countdown item styles and properties in RightBooth v7.12.12 Explaining RightBooth Screen Multicasting RightBooth version 7.12.10 has the following new features and fixes:
New features in this release:
New features and fixes in this release:
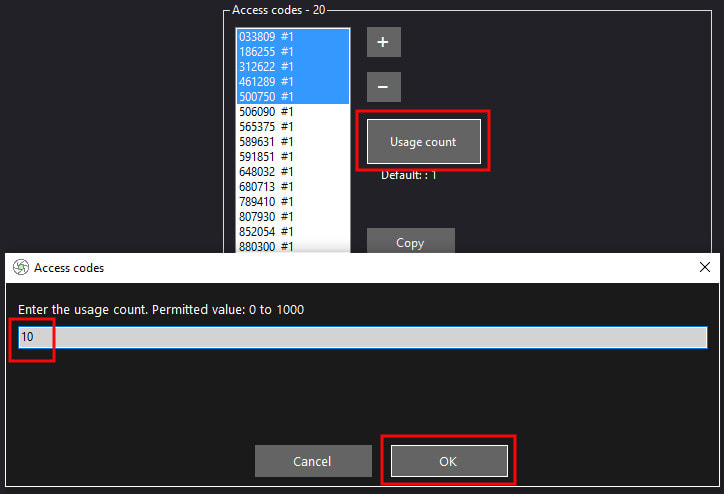
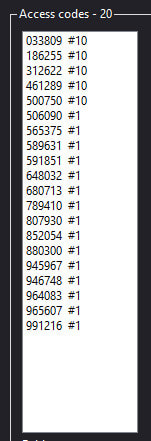
Updated: October 2023 Note: The complete functionality described in this article is available in RightBooth version 7.12.0 (or newer). RightBooth provides an 'Access code' feature which can prevent unauthorised use of your events by requiring guests to enter a 6 digit access code or by showing a QR code to a webcam camera. If the access code is recognised by RightBooth, then the guest will be allowed to use the event. Create Your Access Codes Access code can be created in RightBooth Settings --> Security --> Access codes. Click the '+' button to create a quantity of unique access codes. Here you can see we have created 20 codes: 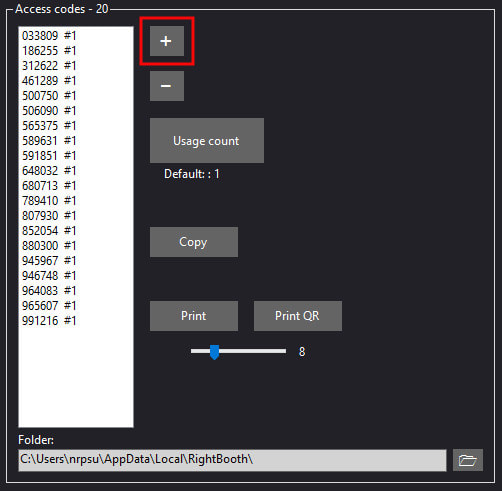 Notice that each code in the list is followed by #1. This is the code Usage count, signifying that the code can only be used one time to access an event. You can increase the usage count of one or more codes by selecting the codes in the list, then clicking the 'Usage count' button and entering a value. Here we are changing the usage count of the first few codes to 10:
Providing Access Codes to Guests The idea is to provide each guest with a printed access code that they can take with them to use at the event booth (or booths). So before the event starts, print out your codes. There are two options: Print numeric codes or Print QR codes. To print codes, first select the codes in the list, then click the 'Print' or 'Print QR' button. Here we are printing all 20 access codes. Notice that the print layout provides white space around each code to facilitate easy cutting: 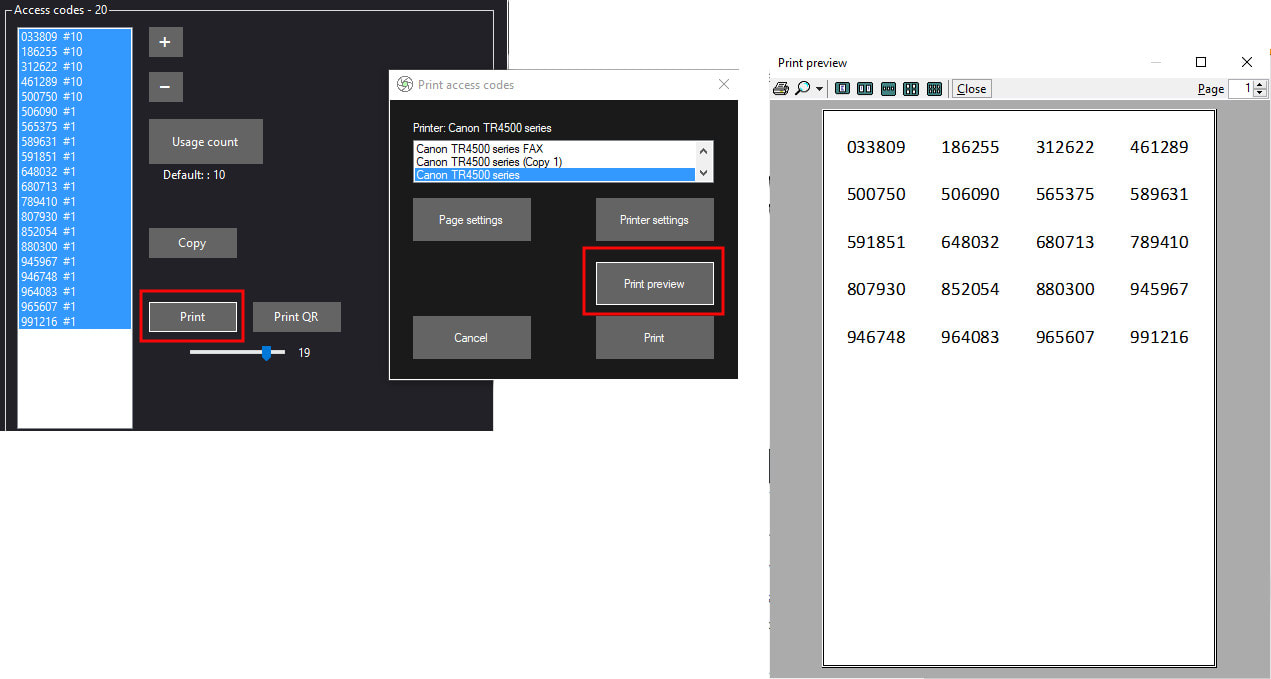 Alternatively, the codes can be printed as QR codes. The slider can be used to alter the font size and/or QR code size:  Now, print your codes and cut them up, ready for handing out to your guests. Setting up your event for Access Code input
Your event is now ready to accept access codes ! This video demonstrates both access code methods in use: Each time a guest uses their access code, the Usage count associated with the code will be reduced by 1 and the access code file will be updated with the new value. When the Usage count for any code drops to 0, that code can no longer be used. However, you can always increase the 'Usage count' feature (as described previously) to add more counts to expired code(s). Using The Same Access Code At Multiple Locations You might have more than one booth in operation at your venue and would like your guests to use the same access code at each booth. To do this, make sure your booths are networked together and can all access the same location on the network that contains your access code file. In RightBooth Settings --> Security --> Access codes choose a network folder for saving the access code file, then in RightBooth on each booth, make sure it is using the same access code folder. In this example we are using a code file that is located in the shared folder: \Codes of the MAIN-PC: 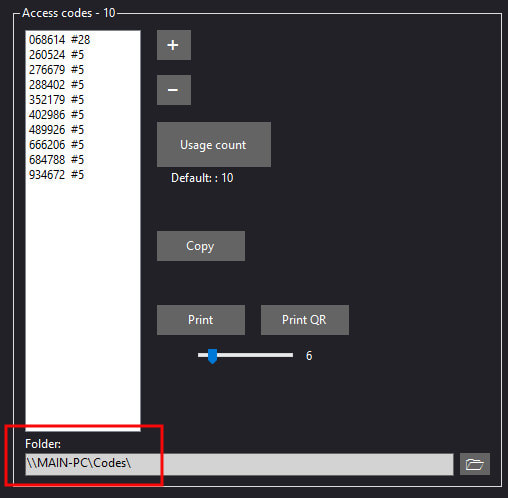 Using QR Access Codes Hands Free If you would prefer your users not to have to interact with the screen, in the Screen Editor, simply add a camera item live view to the Start screen and then play the event. Users can now approach the screen and hold up their QR code in front of the camera lens. RightBooth will then automatically scan the QR code and will progress onto the next screen in the event if the QR code is valid. Please note that this hands free access feature will work with a live feed from a webcam or from a DSLR camera. Note: The Web Gallery feature is available in RightBooth version 7.12.0 (or newer). With a RightBooth Sharing Station event, you can provide your guests with a touchscreen (or mouse) driven interactive system that displays all videos and photos taken during the event. Guests can then interact with the system and download their chosen file(s) onto their mobile phones (via your local WampServer web server and router), using QR code scanning. For more information on how to create and use a sharing station event see here. However, providing a sharing station event can cause bottlenecks as guests queue up, waiting for their turn to use the sharing station. A solution to this problem is to provide your guests with a way to access a Web Gallery of the videos and photos directly on their phones, so that they can browse and download files independently (and away from) your sharing station. This article shows you how to provide this feature. The Web Gallery When you run a sharing station event, RightBooth will automatically create and maintain a Web Gallery web page structure, which is placed in the sharing station event's local web server folder. As an example, let's assume you are running a sharing station event named 'TheSharingStation'. This event will maintain the videos, photos and web gallery in the following folder: c:\wamp64\www\TheSharingStation\ The main web page for the Web Gallery is named: rbgallery.php and it is automatically created and maintained by RightBooth. This file contains php script that can be processed correctly by the WampServer local web server. The Web Gallery automatically maintains thumbnail files for each video and photo in the folder: c:\wamp64\www\TheSharingStation\rbthm\ The Web Gallery also maintains a separate download web page for each video and photo in the folder: c:\wamp64\www\SharingStation\rbqr\. Note: This folder also holds a copy of all the event videos and photos. The reason for this is to prevent file access conflicts between guests who are using the sharing station and guests who are downloading files using the Web Gallery. Here is an example screenshot of our SharingStation1 folder structure, containing four event videos, the two sub folders, the web banner file: rbban.jpg and the file: rbgallery.php: 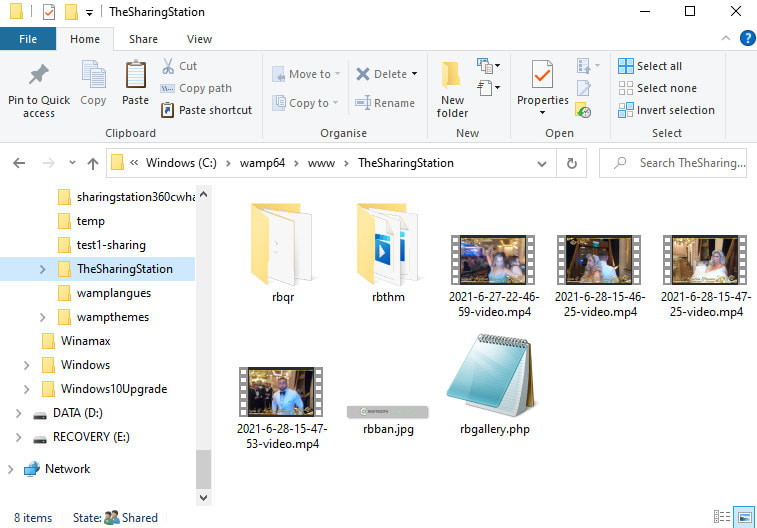 Accessing the Web Gallery Note that the Web Gallery can only be accessed from mobile phones when the computer is running a local web server which is made accessible over a private router. Details here. The simplest way for guests to use the Web Gallery on their phones is to show them a QR code that they can scan to gain direct access. To do this: on any of your sharing station event screens, add a QR code item and set its QR code type to 'Web gallery'. In this screenshot you can see we have provided two QR codes on the Media browser event screen, one to join the network and the other to allow direct access the Web Gallery: 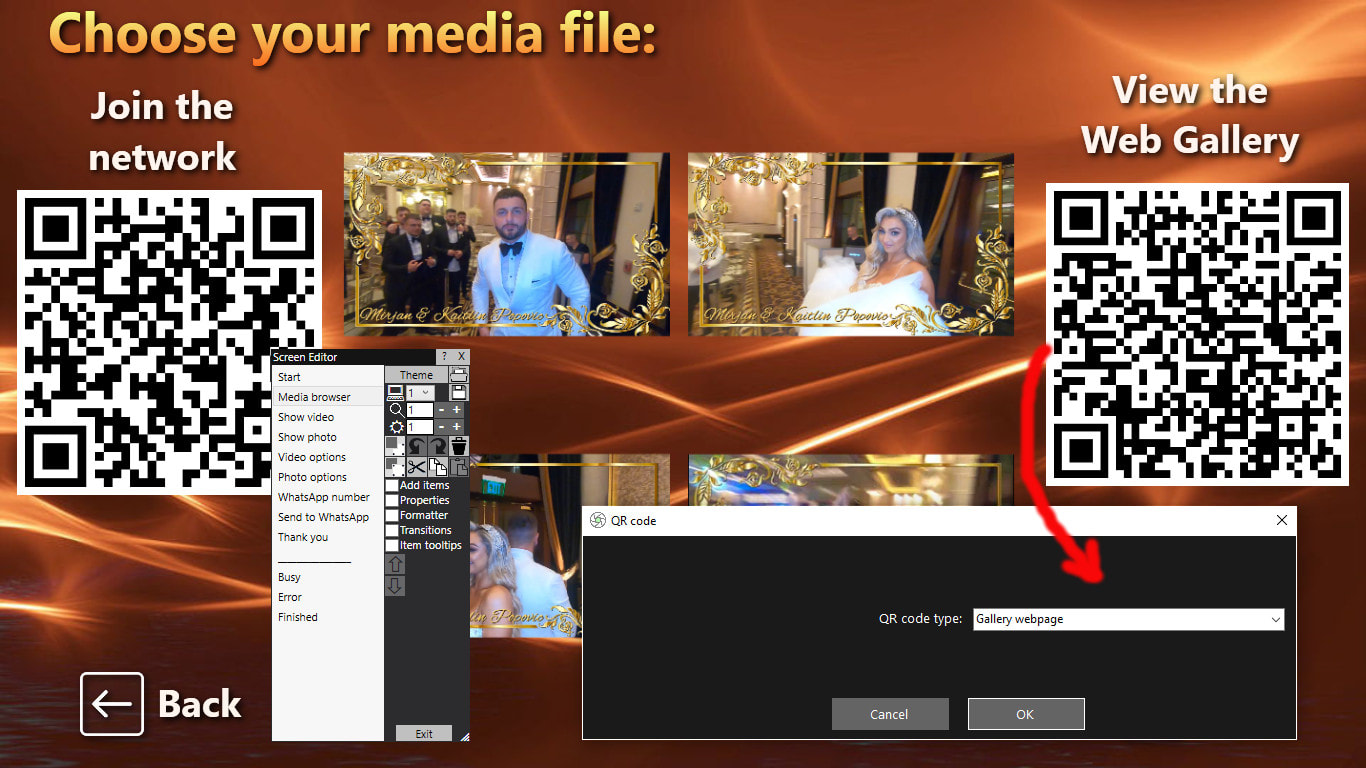 Tip: You might want to print a large copy of the two QR codes and display them around your venue location. To help with this, in the RightBooth Screen Editor, right click on a QR code and choose 'Save image' from the popup menu. The QR code can then be saved as an image file on your computer and used for printing purposes. Modifying the Web Gallery In RightBooth Settings --> Social media --> Local web server, you will find a panel of settings that allow you to change certain aspects of the Web Gallery and web download pages. You can also Test the Web Gallery in your browser as long as WampServer is also running. Also in RightBooth Settings --> Social media --> Media size there is a Thumbnails section where you can set the size and quality of the video and photo thumbnail jpeg files that will be used in the Web Gallery. Setting smaller sizes and lower quality will improve the Web Gallery rendering speed. Now play the event
While the event is playing, RightBooth will maintain the Web Gallery, allowing guests to have independent access to videos and photos from their mobile devices. A few issues have been reported recently regarding RightBooth not playing MP4 videos correctly. Issues include:
If you are experiencing MP4 video playback issues, try the following suggestions: 1 - Change the RightBooth rendering settings In RightBooth Settings --> Start / Stop --> Performance, you will find the following two settings:
Try altering these settings in various combinations and then check to see if it fixes the problem. This suggestion is more relevant to videos that RightBooth is playing on an extended desktop monitor, but it could also have an affect on the primary monitor. 2 - Use the RightBooth Video Player RightBooth version 7.12.0 (or later) includes two video players to choose from. These are available in RightBooth Settings --> Miscellaneous --> Video Player. By default, RightBooth uses the Windows Media Player tech for all its video playing features, but if you are experiencing problems you can now switch to using the RightBooth player to see if that makes a difference:  3 - Install LAVfilters LAVfilters is an Open Source video decoder pack for Windows that provides added support for playing many video formats, including mp4. The new RightBooth player (see above) will especially benefit from installing LAVfilters on your computer, but it can also improve the Windows media player option. You can download and run the latest LAVFilters-x.x.x-Installer.exe from here: https://github.com/Nevcairiel/LAVFilters/releases
RightBooth version 7.11.0 contains the following new features and fixes:
Add the 'Video frame' option in Video enhancements This allows you to place one frame from the source video at the start of the enhanced video for the number of seconds you specify. This feature is useful to give all videos a different thumbnail if hosted on your own websites. Add the option to 'Watch subfolders' in a Sharing Station event This option will cause a RightBooth sharing station event to show all sub folders that contain videos and images. Users can then navigate into and out of the sub folders while interacting with the Media Browser. Add the option to process the 'Oldest file first' in a 'Watch folder' event In a 'Watch folder' event you can tick the 'Oldest file first' option to force RightBooth to process incoming files in the order that they arrive in the folder. Add the 'Files to Android' event action Adding this action to a button on the 'Show video' or 'Show photo' event screen will allow your users to select the button. RightBooth will then prompt the user to connect an Android device (phone) to a USB cable connected to the PC. RightBooth will then auto detect the connection and transfer the chosen file to the DCIM folder on the Android device. This action can be used in a Recording event or Sharing station event as another option to allow users to transfer event files to their phones. Allow the keyboard arrow keys to alter the grid selection when the user input mode is 'Multiple keys' or 'Multiple USB buttons' Users can now use the 'Left' 'Right' 'Up' and 'Down' arrow keys on the keyboard to allow them to select an item in any RightBooth grid item, e.g. Media browser, karaoke file selector, greenscreen image selector, etc. Include the 'RestartRB' utility The new RestartRB utility app is installed in Program Files (x86)\RightBooth and it allows you to quickly stop all running instances of RightBooth and restart the first instance. This is useful if RightBooth crashes and remains in memory. GoPro Configuration Options RightBooth now provides 4 different configuration options for controlling a GoPro camera:
Include the RBCameraController mini app This new app can be used to allow RightBooth to remotely control a GoPro that is connected to another computer on the network. Full details on the RBCameraController app and how it is used can be found in the Option 4 documentation here Add the 'GOPROWIFI' text variable Use this new text variable on an event screen to allow you to see the current GoPro WiFi status as either 'OK' or '??' Show all FTP files (uploaded during the event) in Tasks All files that are FTP uploaded (or attempted upload) during the event are now added to the FTP file list in RightBooth Tasks. This allows you to upload the files again at a later time and this can be useful if one or more files had failed to upload during the event. Fixes:
This video explains the main new features added in RightBooth v7.10.0. Full list of new features in RightBooth v7.10.0:
RightBooth version 7.9.7 has been released. New features and fixes:
Note: This feature requires RightBooth v7.9.3 (or later). This article explains how to use RightBooth to create videos and photos by taking the camera feeds from two webcams and combining them into one file, as shown in the following demonstration video: Step 1 - Setup the webcams
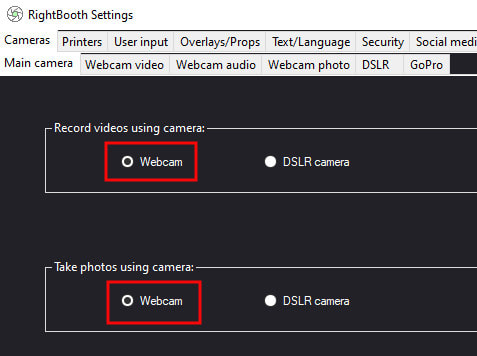
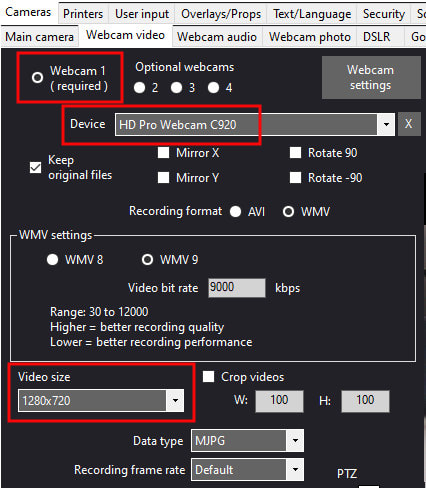
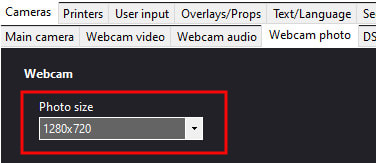
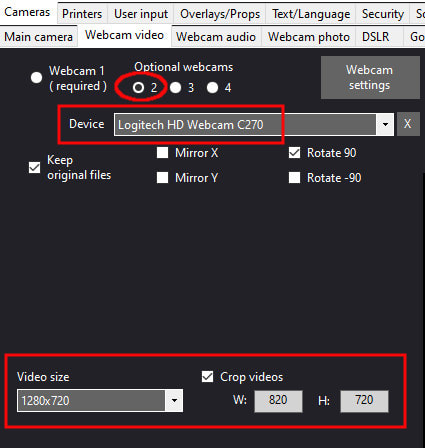
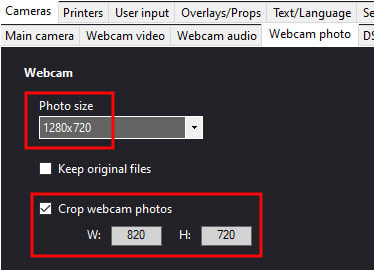 Your webcams are now set up to be used for Picture in Picture recordings. Step 2 - Design your event
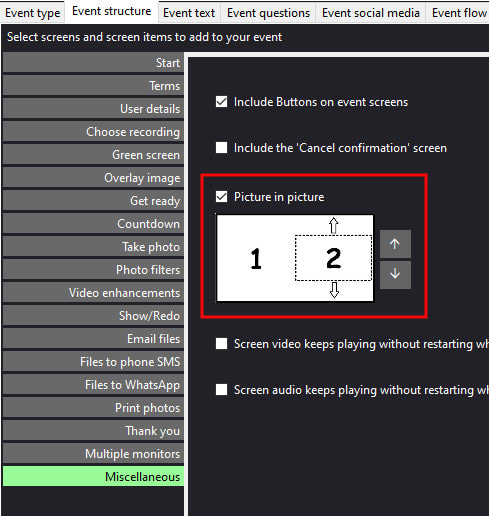 Choosing this option will cause RightBooth to overlay the camera feed from webcam 2 directly on one half of the camera feed from webcam 1. The two feeds will then be treated as one combined feed for the purposes of recording videos and taking photos in RightBooth.
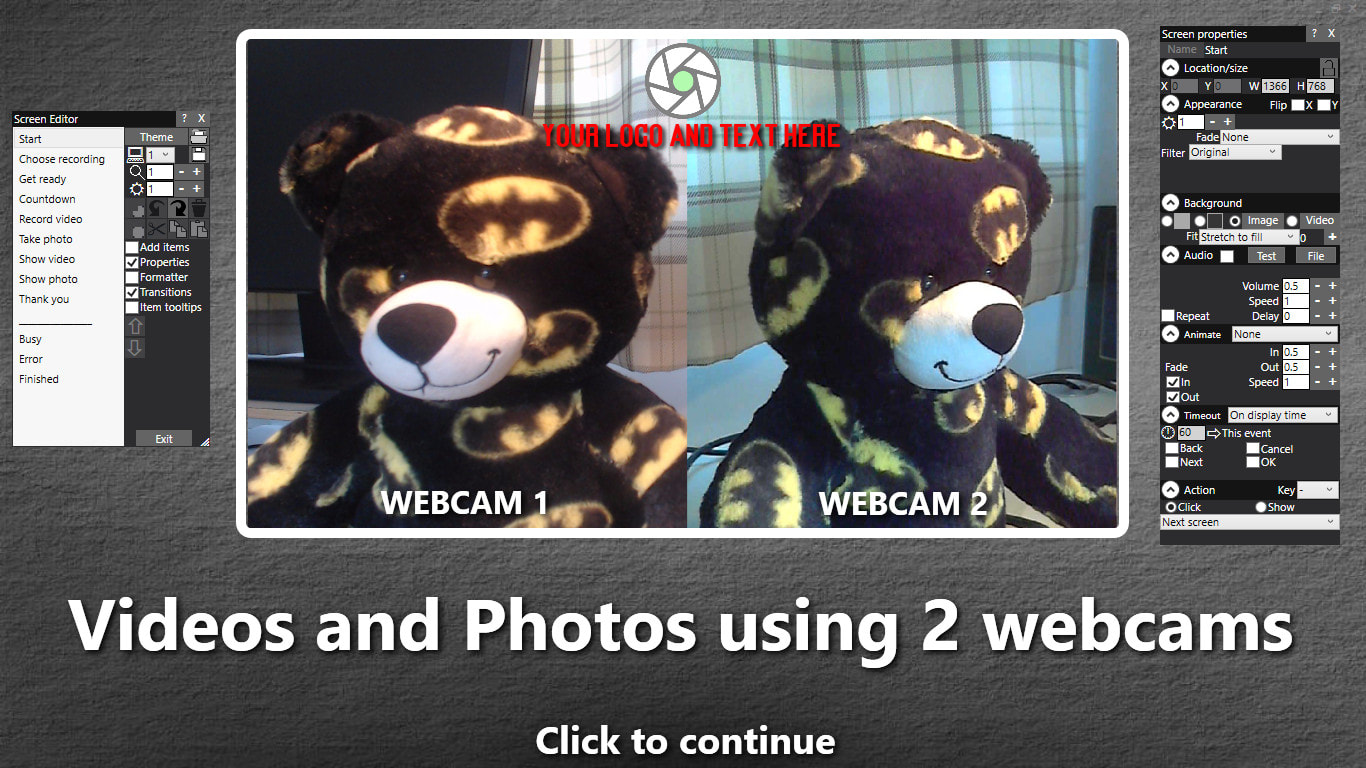
You are now ready to Play the event and record videos and photos from two combined webcams. Note:
|
AuthorNigel Pearce 
Archives
April 2024
|

 RSS Feed

|
|